1. Administration Portal
The Admin Portal is accessible to users with the admin role assigned by the OIDC provider and subsequently provided to C-PAT via the user’s token. Users whose token contains the admin role will automatically be presented with an “Admin Portal” button in the side menu bar. The Admin Portal provides a way to manage users, collections, integrations, and fine-tune options that best align with particular organizational policies and operations.
2. User Management
The User Management section allows administrators to view, manage, and modify user accounts within C-PAT.
Note
By default, when a user first logs into C-PAT, they are assigned a PENDING account status and will not be able to access the application until an administrator approves their account. This step is implemented to ensure that only authorized users have access to the application and administrators have the ability and oversight to dictate more precise permissions and access.
To approve a user account, an administrator must navigate to the User Management section, select the user account from the dropdown at the bottom of the User Table, and change the Account Status to ACTIVE. Once approved, the user will be able to access the application and navigate to any collections for which they have been assigned permissions.
2.1. Pre-Onboarding a User
Administrators can pre-register (onboard) a user account before that user has ever logged in. This allows team assignments, collection permissions, and account status to be configured in advance so that the user is fully provisioned the moment they first authenticate, eliminating the usual back-and-forth of waiting for a first login before account setup can begin.
To pre-onboard a user:
In the User Management section, click the Onboard User button in the toolbar above the User Table.
Enter the user’s Username. This is the only required field.
Optionally enter the First Name, Last Name, and Email, and select the desired Account Status (defaults to
PENDING).Click Onboard. The new account opens immediately for editing, where the administrator can assign teams and collection permissions just as they would for any existing user.
Warning
The Username must exactly match the username claim that the OIDC provider will include in the token (the claim configured as the C-PAT username claim, e.g. preferred_username). The value is case-sensitive and limited to 100 characters. If the entered username does not match the token claim, the user’s first login will create a separate, unconfigured account rather than recognizing the pre-onboarded one.
Note
When a pre-onboarded user logs in for the first time, any identity fields left blank during onboarding (first name, last name, email) are automatically populated from the token. Values entered by the administrator during onboarding are preserved and take precedence over the token.
Assuming a correct C-PAT and OIDC configuration, user data should be automatically populated from the OIDC provider. If the user data is not automatically populated, the user data can be manually entered by an administrator. Accurate and complete user data is important to the flow of the C-PAT application, particularly when it comes to exporting into the eMASS excel format. User first name, last name, email, phone number, and office/organization are all pre-populated into a C-PAT export when available.
2.2. C-PAT Collection Privileges
Privilege |
Allows |
|---|---|
Viewer |
The Viewer role is most commonly attributed to readonly access. Users who have been granted the Viewer role for a collection can view the collection and its associated POAMs, Assets, Labels, etc. Users with the Viewer role however, cannot make any changes or add new items. |
Submitter |
The Submitter role is the recommended role for users who should not be restricted to readonly access and who do not explicitly need POAM approval access for the collection. Users with Submitter access will have access to add and modify data for POAMs, Assets, Labels, etc. |
Approver |
The Approver role is the recommended role for users who need to approve POAMs for the collection. Users with the Approver role will have the same access as that of the Submitter role, in addition to access to issue final approval or rejection for CAT II and CAT III POAMs. In the case of CAT I POAMs, an Approver can (and should) review and mark the POAM as approved, but the final approval must be issued by a CAT I Approver. |
CAT I Approver |
The CAT I Approver role provides the highest level of access to a collection. Users with the CAT I Approver role will have the same access as that of the Approver role, in addition to the ability to issue final approval for CAT I POAMs. CAT I Approvers are the only users who can issue final approval for CAT I POAMs. |
3. Collection Management
Collection Management provides C-PAT administrators with the ability to manually create new collections, import collections from STIG Manager or Tenable.sc, modify existing collections, and export the POAMs contained within one or more collections into the eMASS excel format. Each collection also has the ability to enable or disable manual POAM creation.
The toolbar above the collection table contains three actions:
Bulk Import (cloud download icon): Opens the Bulk Import dialog to import one or more collections from STIG Manager or Tenable.sc in a single operation.
Export Multiple Collections (download icon): Opens the export dialog to combine POAMs from one or more collections into a single eMASS excel file.
Add Collection (plus icon): Opens the Add Collection dialog to manually create a collection or to import a single collection from STIG Manager or Tenable.sc.
Note
While the Collection Name is the only required field for a collection, it is strongly recommended that all Collection fields are entered to ensure proper data flow within C-PAT.
3.1. Collection Field Mappings
Collection Name: The name of the collection. For collections that are imported from STIG Manager or Tenable, the collection name should match the collection name from the respective system. The collection name will be displayed in navigation across C-PAT and be contained in the file name of POAM exports.
Collection Description: A brief description of the collection.
Collection Type:
C-PATfor manually created collections, orSTIG Manager/Tenableto associate the C-PAT collection with an origin in the corresponding system.System Type: This field will map to Cell
L2in the eMASS format excel export.System Name: This field will map to Cell
D5in the eMASS format excel export.CC/S/A/FA: This field will map to Cell
D4in the eMASS format excel export.A&A Package: C-PAT provides the ability to associate an A&A package with a collection. When a collection has an A&A package set, this field will be automatically populated for any POAM created within the collection.
3.2. Importing a Single Collection from STIG Manager or Tenable.sc
The Add Collection dialog handles both manual creation and single-collection imports. To import a single collection:
Click the Add Collection button (plus icon) in the toolbar above the collection table.
In the Collection Type dropdown, select
STIG ManagerorTenable.The collection dropdown will populate with available origins. Collections that have already been imported are filtered out automatically, leaving only origins that have not yet been associated with a C-PAT collection.
Choose the desired STIG Manager collection or Tenable repository.
Fill in any additional fields as desired, then click Save.
When a collection is imported, the C-PAT collection becomes a shell that interfaces with the selected STIG Manager collection or Tenable repository.
Note
To convert an existing manually created collection into an integrated one (or vice versa), click the row to open the modify dialog, change the Collection Type, and confirm the prompt before selecting the new origin.
3.3. Bulk Importing Collections
To import multiple collections at once:
Click the Bulk Import button (cloud download icon) in the toolbar above the collection table.
If more than one source is available, choose the Source (
STIG ManagerorTenable). The Tenable option is only displayed when the Tenable feature is enabled in App Configuration.The list will populate with collections that have not yet been imported.
Use the search box to filter, then check one or more entries.
Click Import. Each selected entry is imported as a new C-PAT collection and the table refreshes when the operation completes.
Note
Once all collections from a source have been imported, the list will be empty.
After importing, users must still be assigned the appropriate permissions to the newly imported collection before they can view or access it.
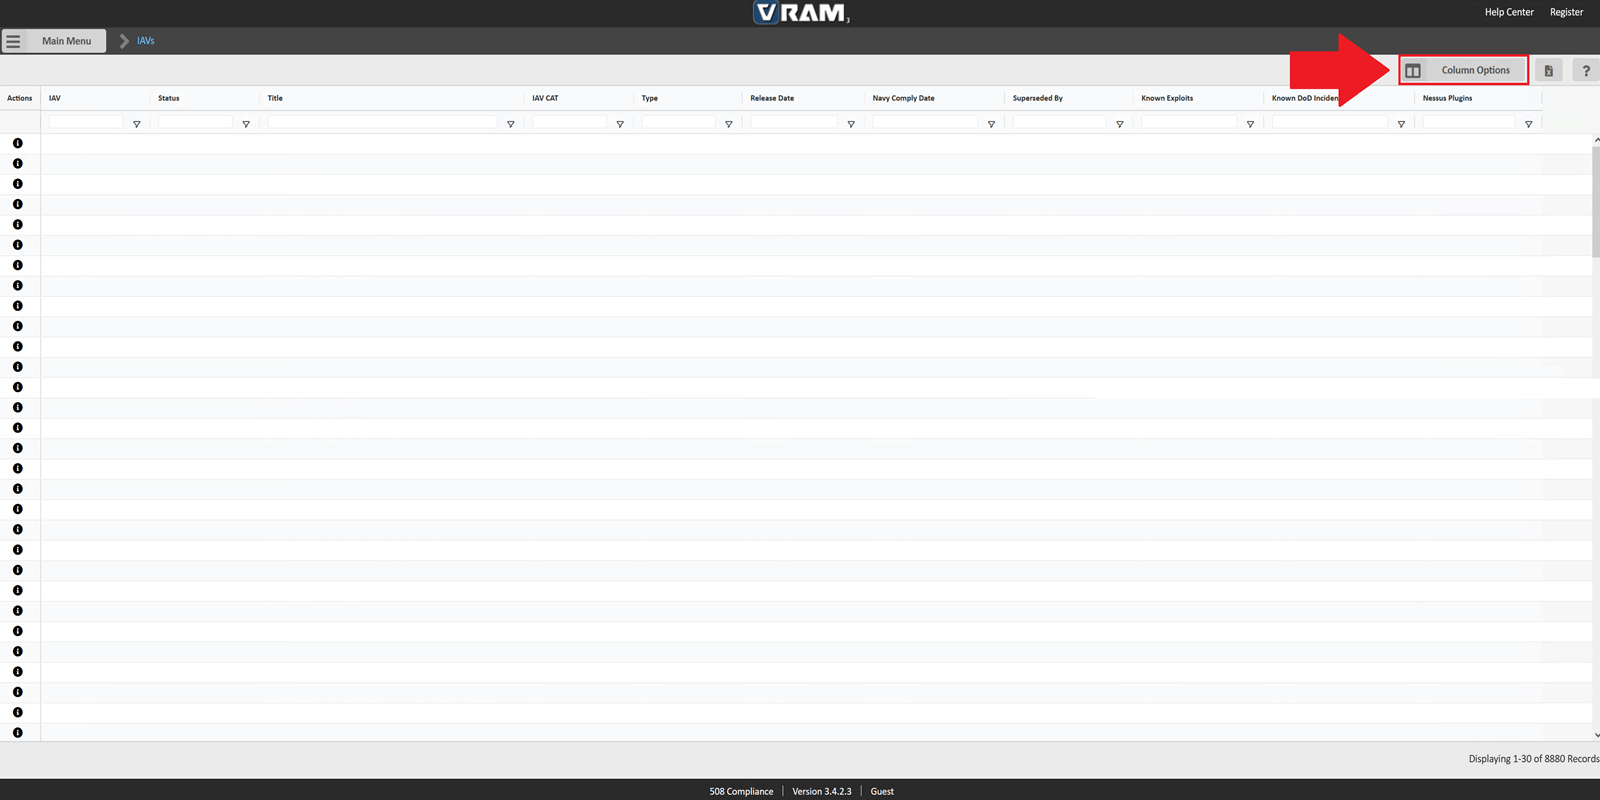
4. VRAM IAV Import
Importing a current VRAM IAV Table into C-PAT is the first step of a two part process as it relates to corelating Navy Comply Dates with Tenable vulnerability findings or plugin IDs. The VRAM IAV Table can be accessed and exported here.
Note
C-PAT will automatically process the date information is current as of, contained in cell A1 of the VRAM IAV export. All subsequent uploads will compare this date when a new file is uploaded.
4.1. Column Options
Note
C-PAT is configured to automatically parse the required columns by name, therefore, the default column selections are only a minimum requirement. Additional columns or different column orders in the export are permissible.
At a minimum, the following fields ARE required: IAV Status Title IAV CAT Type Release Date Navy Comply Date Superseded By Known Exploits Known DoD Incidents Nessus Plugins

4.2. Export
Click to export. The exported file can now be imported to C-PAT.

5. Importing VRAM Data Into C-PAT
The exported VRAM excel document can now be imported into C-PAT by navigating to the “VRAM IAV Import” tab within the admin portal. The import process will automatically parse the required columns and populate the IAV table in C-PAT, allowing the requisite data for plugin mapping and subsequent processing.
Note
After selecting the file to import or dragging and dropping the appropriate file, you MUST click the green import button.
6. Nessus Plugin Mapping
The ‘MAP PLUGINS TO IAV’ button will initiate the process of mapping IAV data to Tenable plugin IDs. This is an intensive operation that queries the Tenable analysis endpoint to return plugins with a cross reference[xref] for IAVs from 1990 to present. IAVA|20*,IAVB|20*,IAVT|20*,IAVA|199*,IAVB|199*,IAVT|199*
Note
This process will take approximately 60 seconds to complete. Clicking away from the page will terminate the mapping and the process must be started over again.
7. Asset Deltas
The Asset Deltas component is designed to handle two types of imports.
An excel (.xls, .xlsx, .xlsm) or CSV (.csv) document containing a key:value pair of Assets and Team Names. This import routine was designed with the intent of importing an Active Directory .csv export where Asset Names are exported to Column A and OU is exported to Column B, however, exporting from Active Directory is not a requirement. Row 1 is reserved for the column headers and should not contain any data.
An eMASS Hardware List excel export.
The import process will automatically parse the document and populate the Asset Deltas table with the provided data. The table can be sorted by any column by clicking on the respective column header. The table can also be filtered by entering text into the search bar located above the table or through clicking the filter icon located next to any column name. This component contains functionality to query Tenable and STIG Manager using the provided asset names and determine if the asset exists within the respective service. After a successful query runs, the Tenable and STIG Manager column will be populated with icons (Green Checkmark or Red X) and the charts will update to depict asset existence and Team breakdown. Any subsequent column filtering will also update the “Total Assets” count located above the chart. Exporting of this table is also available for further analysis or record keeping. Asset existence will be exported as True or False.
Note
The importing of Assets enables functionality to automatically assign a Team to a POAM if a match is found to an asset within the imported asset list. This feature is enabled by populating the AD Team field after selecting a team within the Assigned Teams component.
8. A&A Packages
C-PAT provides the ability for administrators to set A&A package options for their organization. In addition to populating the list of options when setting an A&A package for a particular collection, the A&A packages entered in the Set A&A Packages component will populate a drop down list of options in POAMs for instances when a POAM entry may require deviation from the pre-populated A&A Package.
Note
Any A&A Package containing “Zone: D”, “Zone D”, “Zone: C”, or “Zone C” will result in a change of the default Tenable Vulnerability table filter of Vulnerability Last Observed “Within 30 Days” to “Within 90 Days”
9. Assigned Teams
The Set Assigned Teams component allows administrators to create a team structure that fits their organization. Teams can be assigned collections of responsiblity. Subsequently, when assigning user permissions, a team can be selected with an appropriate access level for a user. In essence, a user will be given acess to each collection the team is assigned at the access level selected without having to manually assign each individual collection. This structure allows for a more granular approach to permissions and access control within C-PAT. In addition to Team Name and Team Permissions, assigned Teams also contains an AD Team field. The Asset Delta[Active Directory?] field is used to establish a link between a C-PAT team and a team name as provided in the AD Team list. This corelation allows for automatic team assignments to POAMs if an affected asset name matches with an AD row entry.
10. App Configuration
The app configuration component allows administrators to set application-wide options that will be applied to all users and collections within C-PAT. This includes setting basline parameters for the application, such as the maximum scheduled completion time for each severity level.